
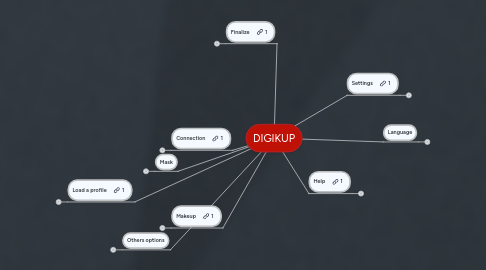
1. Load a profile
1.1. Click on load a profile
1.2. Choose a profile
1.3. Choose a set
2. Settings
2.1. Client settings
2.1.1. Add client
2.1.1.1. Click on add a client
2.1.1.2. Enter a name
2.1.1.3. Enter a collection name
2.1.1.4. Choose a face picture
2.1.1.5. Choose a right profile
2.1.1.6. Choose a left picture
2.1.2. Delete client
2.1.2.1. Click on delete a client
2.1.2.2. Select a profile
2.1.2.3. Click on delete
2.1.3. Add a set
2.1.3.1. Click on add a set
2.1.3.2. Select a profile
2.1.3.3. Enter a set name
2.1.3.4. Choose the face picture
2.1.3.5. Choose the left picture
2.1.3.6. Choose the right picture
2.1.3.7. Click on add
2.1.4. Update a set
2.1.4.1. Click on update a set
2.1.4.2. Select a profile
2.1.4.3. Select a set
2.1.4.4. Choose the face picture
2.1.4.5. Choose the left picture
2.1.4.6. Choose the right picture
2.1.4.7. Click on update
2.1.5. Delete a set
2.1.5.1. Click on delete a set
2.1.5.2. Select a profile
2.1.5.3. Select a set
2.2. Size detection
2.2.1. Click on size detection
2.3. Log
2.3.1. Click on log
2.4. User settings (Admin only)
2.4.1. Add user
2.4.1.1. Click on add user
2.4.1.2. Enter a login
2.4.1.3. Enter a password
2.4.1.4. Enter for a second time a password
2.4.1.5. Click on create
2.4.2. Update user
2.4.2.1. Click on update a user
2.4.2.2. Enter a login
2.4.2.3. Enter the current password
2.4.2.4. Enter a new password
2.4.2.5. Enter for a second time th new password
2.4.2.6. Click on update
2.4.3. Delete user
2.4.3.1. Click on delete a user
2.4.3.2. Enter a login
2.4.3.3. Enter the password
2.4.3.4. Click on delete
3. Language
3.1. American
3.1.1. Click on the correct icon
3.2. French
3.2.1. Click on the correct icon
3.3. Thai
3.3.1. Click on the correct icon
4. Mask
4.1. Create a mask
4.1.1. Fisrt step
4.1.1.1. See load a profile (details in the part named "load a profile")
4.1.1.2. Click on mask
4.1.1.3. Click on create a mask
4.1.2. Second step
4.1.2.1. Choose the face part
4.1.2.2. Delimitate the area with the cursor
4.1.2.2.1. it's possible to zoom in the picture with the weel.
4.1.2.2.2. Center click for move in the picture
4.1.2.3. Right click to finish this face part
4.1.2.4. Restart for the others face parts
4.1.2.5. Click on validate
4.1.3. Third step
4.1.3.1. Restart he second part for the three pictures (face,right and left)
4.2. Save a mask
4.2.1. First step
4.2.1.1. See Load a profil (details in the part named "load a profile")
4.2.1.2. Click on mask
4.2.1.3. Click on create a mask
4.2.2. Second step
4.2.2.1. Chooe the face part
4.2.2.2. Délimate the area with the cursor
4.2.2.3. Right click to finish this face part
4.2.2.4. Restart for the others face parts
4.2.2.5. Click on save mask
4.2.2.6. Click on validate
4.2.3. Third step
4.2.3.1. Restart the second part for the three pictures (face, right, left)
5. Makeup
5.1. See load a profile (details in the part named "load a profile")
5.2. If never mask was created, click create mask (details in the part named "load a profile")
5.3. Click on makeup
5.4. Choose the face area (eyebrow, cheeks, lips)
5.5. Click on the color (3 colors for the eyebrows and lips but only color ofr the cheeks)
5.6. or
5.7. Click on looks
5.8. Click on a automatic makeup
6. Help
6.1. Load a profile (details in the part named "load a profile")
6.2. Click on help
7. Finalize
7.1. See load a profile (details in the part named "load a profile")
7.2. If never mask was created , click on mask (detail in the part named "mask")
7.3. if never makeup was applicated, click on makeup (detail in the part names "makeup")
7.4. Click on finalize
8. Others options
8.1. Before/After
8.1.1. See load a profile (details in the part named "load a profile")
8.1.2. If never mask was created, click create mask (details in the part named "load a profile")
8.1.3. if never makeup was applicated, click on makeup (detail in the part names "makeup")
8.1.4. Click on before/after
8.2. Global
8.2.1. See load a profile (details in the part named "load a profile")
8.2.2. click on global
8.3. Display
8.3.1. See load a profile (details in the part named "load a profile")
8.3.2. click on display