

1. PART 1
1.1. Accounts to be created
1.1.1. An account on GitHub
1.1.2. An account in Zotero
1.2. Installations
1.2.1. GitHub Desktop
1.2.2. Zotero Desktop
1.2.3. RStudio
1.2.3.1. Install inside RStudio:
1.2.3.1.1. flexdashboard
1.2.4. R
2. PART 2
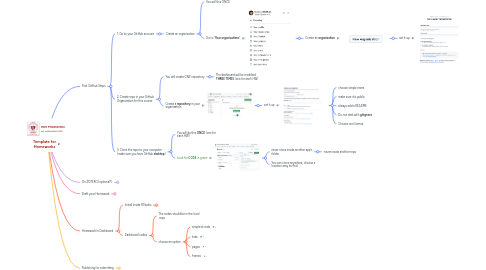
2.1. 1. Create an organization for this course
2.1.1. Go to your GitHub account
2.1.2. Then, you will do this ONCE during the course
2.1.2.1. Go to "**Your organizations**"
2.1.2.1.1. Create an **organization**
2.2. 2. Create repo in your Github Organization for this course
2.2.1. You will create ONE repository
2.2.1.1. Then, you will do this ONCE during the course
2.2.1.1.1. The dashboard will live in this repo, and will be modified at each HW
2.2.2. Create a **repository** in your organization
2.2.2.1. set it up
2.2.2.1.1. choose simple name
2.2.2.1.2. make sure it is public
2.2.2.1.3. always add a README
2.2.2.1.4. Do not deal with **gitignore**
2.2.2.1.5. Choose one license
2.3. 3. Clone the repo to your computer (make sure you have GitHub **desktop**)
2.3.1. You will do this **ONCE**
2.3.2. Look for **CODE** in green
2.3.2.1. never clone inside another app's folder
2.3.2.1.1. never inside another repo
2.3.2.2. You can clone anywhere, choose a location easy to find
2.4. 4. Add content to local repo
2.4.1. put this data inside the repo
3. On ZOTERO (optional?)
3.1. Create Collection
3.1.1. name it **testVisual**
3.2. Add contents
3.2.1. https://doi.org/10.1017/9781108625425
3.2.2. https://pkgs.rstudio.com/flexdashboard/authors.html#citation
3.3. Download the collection into the repo
3.3.1. HERE IS FILE...if you do not create it
4. Draft your Homework
4.1. Data
4.2. Code for visualizations inside the repo
5. Homework in Dashboard
5.1. Install inside RStudio
5.1.1. **FLEXDASHBOARD**
5.2. Dashboard codes
5.2.1. The codes should be in the local repo
5.2.2. choose an option
5.2.2.1. simplest code
5.2.2.2. tabs
5.2.2.3. pages
5.2.2.4. frames
6. Publishing for submitting
6.1. Knit your homework
6.1.1. rename the _html file_ generated as **index.html** (lowercase only)
6.1.1.1. This same file will be updated when you add more visualizations in the coming homeworks
6.2. Back to GitHub: check the desktop app
6.2.1. You will do this for every homework
6.2.1.1. commit
6.2.1.2. push
6.3. Go to your "Repo" on the GitHub cloud
6.3.1. easy way to find from the desktop app!
6.4. Go to "Settings"
6.4.1. use pages!
6.4.1.1. final steps
6.4.1.1.1. wait for link to appear!
6.4.2. you do **NOT** need to update the link after each homework