There are many tools designers can use to design user interfaces, user experiences, and customer experiences—from sticky notes on a wall to fully functional prototypes—but mind mapping, according to product designer Eugene Rudyy, is one of the most efficient.

In this post, we’re going to walk you through how you can create mind maps for UI, UX, and CX designs and show you some of the benefits of using a mind-mapping tool like MindMeister to collaborate with others, solicit ideas, and share your ideas, designs, and assets.
Table of Contents:
Interested in learning about different ways to use mind maps? Check out these creative and inspirational mind map examples.
Using Mind Maps for UI Design
The most basic way to use mind maps for UI design is to design the main navigation of your website.
Call a meeting with any relevant stakeholders and subject-matter experts to determine what pages your site needs. Ask several questions:
- Are there multiple products/services/features that each need their own pages?
- Are there different target customer personas that each need their own pages?
- Will you have a blog, support center, or other resource pages?
Once you’ve collected a list of the pages you think your site will have, you can begin sorting those pages into a navigational hierarchy, stemming from the homepage.
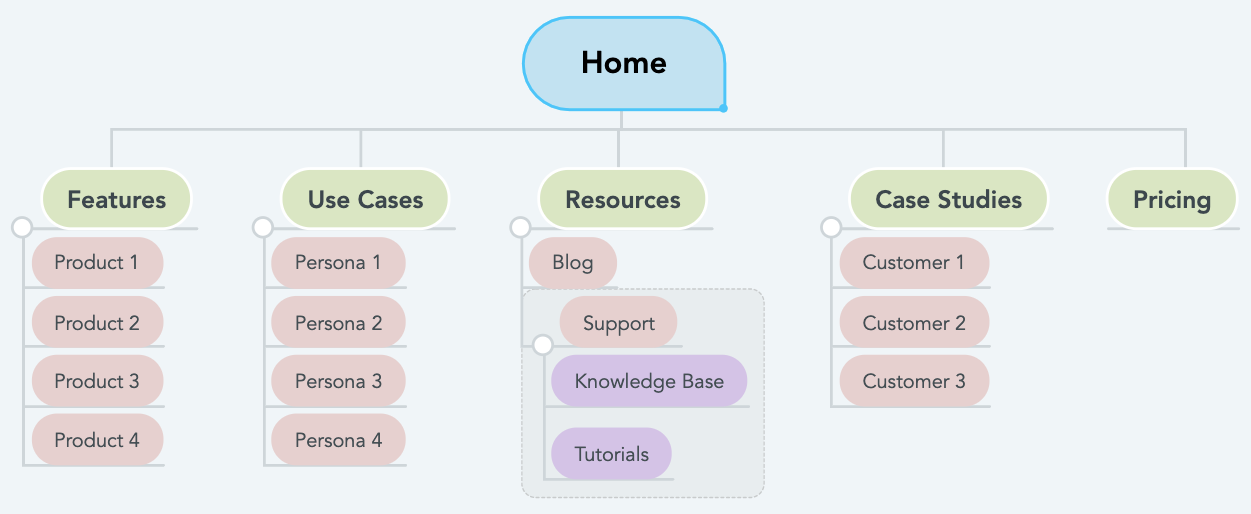
With this exercise complete, you’ll have the basic navigational structure of the site determined. But before you start designing each page, you’ll also need to consider the user experience—how different types of users will flow from one page to another on your site.
Using Mind Maps for UX Design
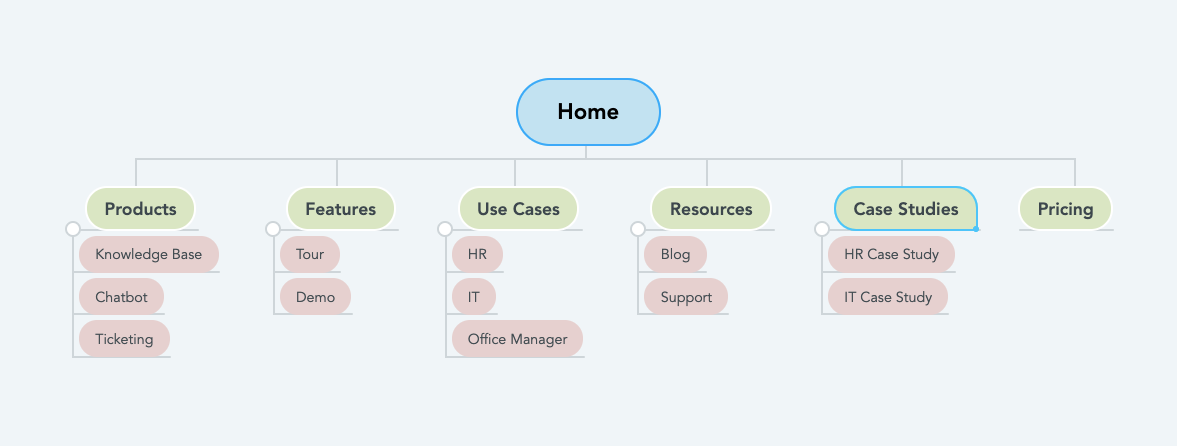
Let’s update our example above with some sample data.
In this example, we’re building a website for a SaaS tool that’s used by internal support teams. We have three products—a knowledge base tool, a chatbot tool, and a ticketing tool—and three main customer personas: IT support teams, HR teams, and office managers.
In addition to pages for those features and audience segments, we’re also going to have a tour page with videos that walk people through the different features of the product, a live demo request page, a blog, support hub, pricing page, and two case studies.
What we want to do now is design the customer experience flow for each of our audience segments. How do we want to guide these prospects through the different pages of the site that are relevant to their needs, ultimately getting them to sign up for a free trial or request a demo?
We can start by identifying which pages are applicable to each of our personas. For HR prospects, that includes the knowledge base and chatbot pages (HR personas tend to be less interested in the ticketing tool), the HR use case page, the HR case study, and any blog posts written for an HR audience.
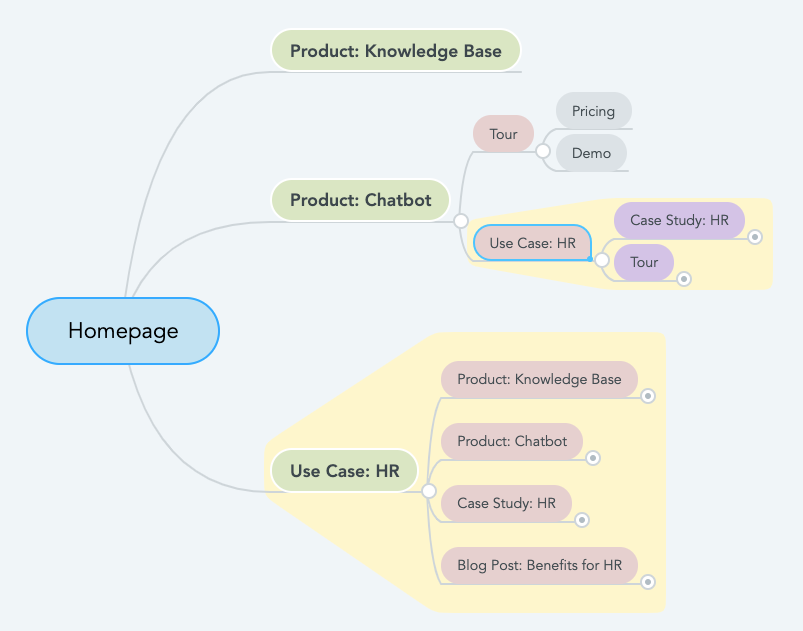
We’ll highlight the pages that apply to the journey of an HR prospect on our map:

Now, we can pull those pages to create a separate mind map that represents the ideal journey through our website for HR prospects. Essentially, we need to figure out which pages people from that audience segment are most likely to click on after landing on our homepage. From there, we can make UX decisions.
Let’s say that this prospect is most likely to click on one of three pages: the knowledge base product page, the chatbot product page, or the HR use case page. We can then decide what other pages that those three pages need to link to in order to guide those prospects through the educational portion of their buying journeys.
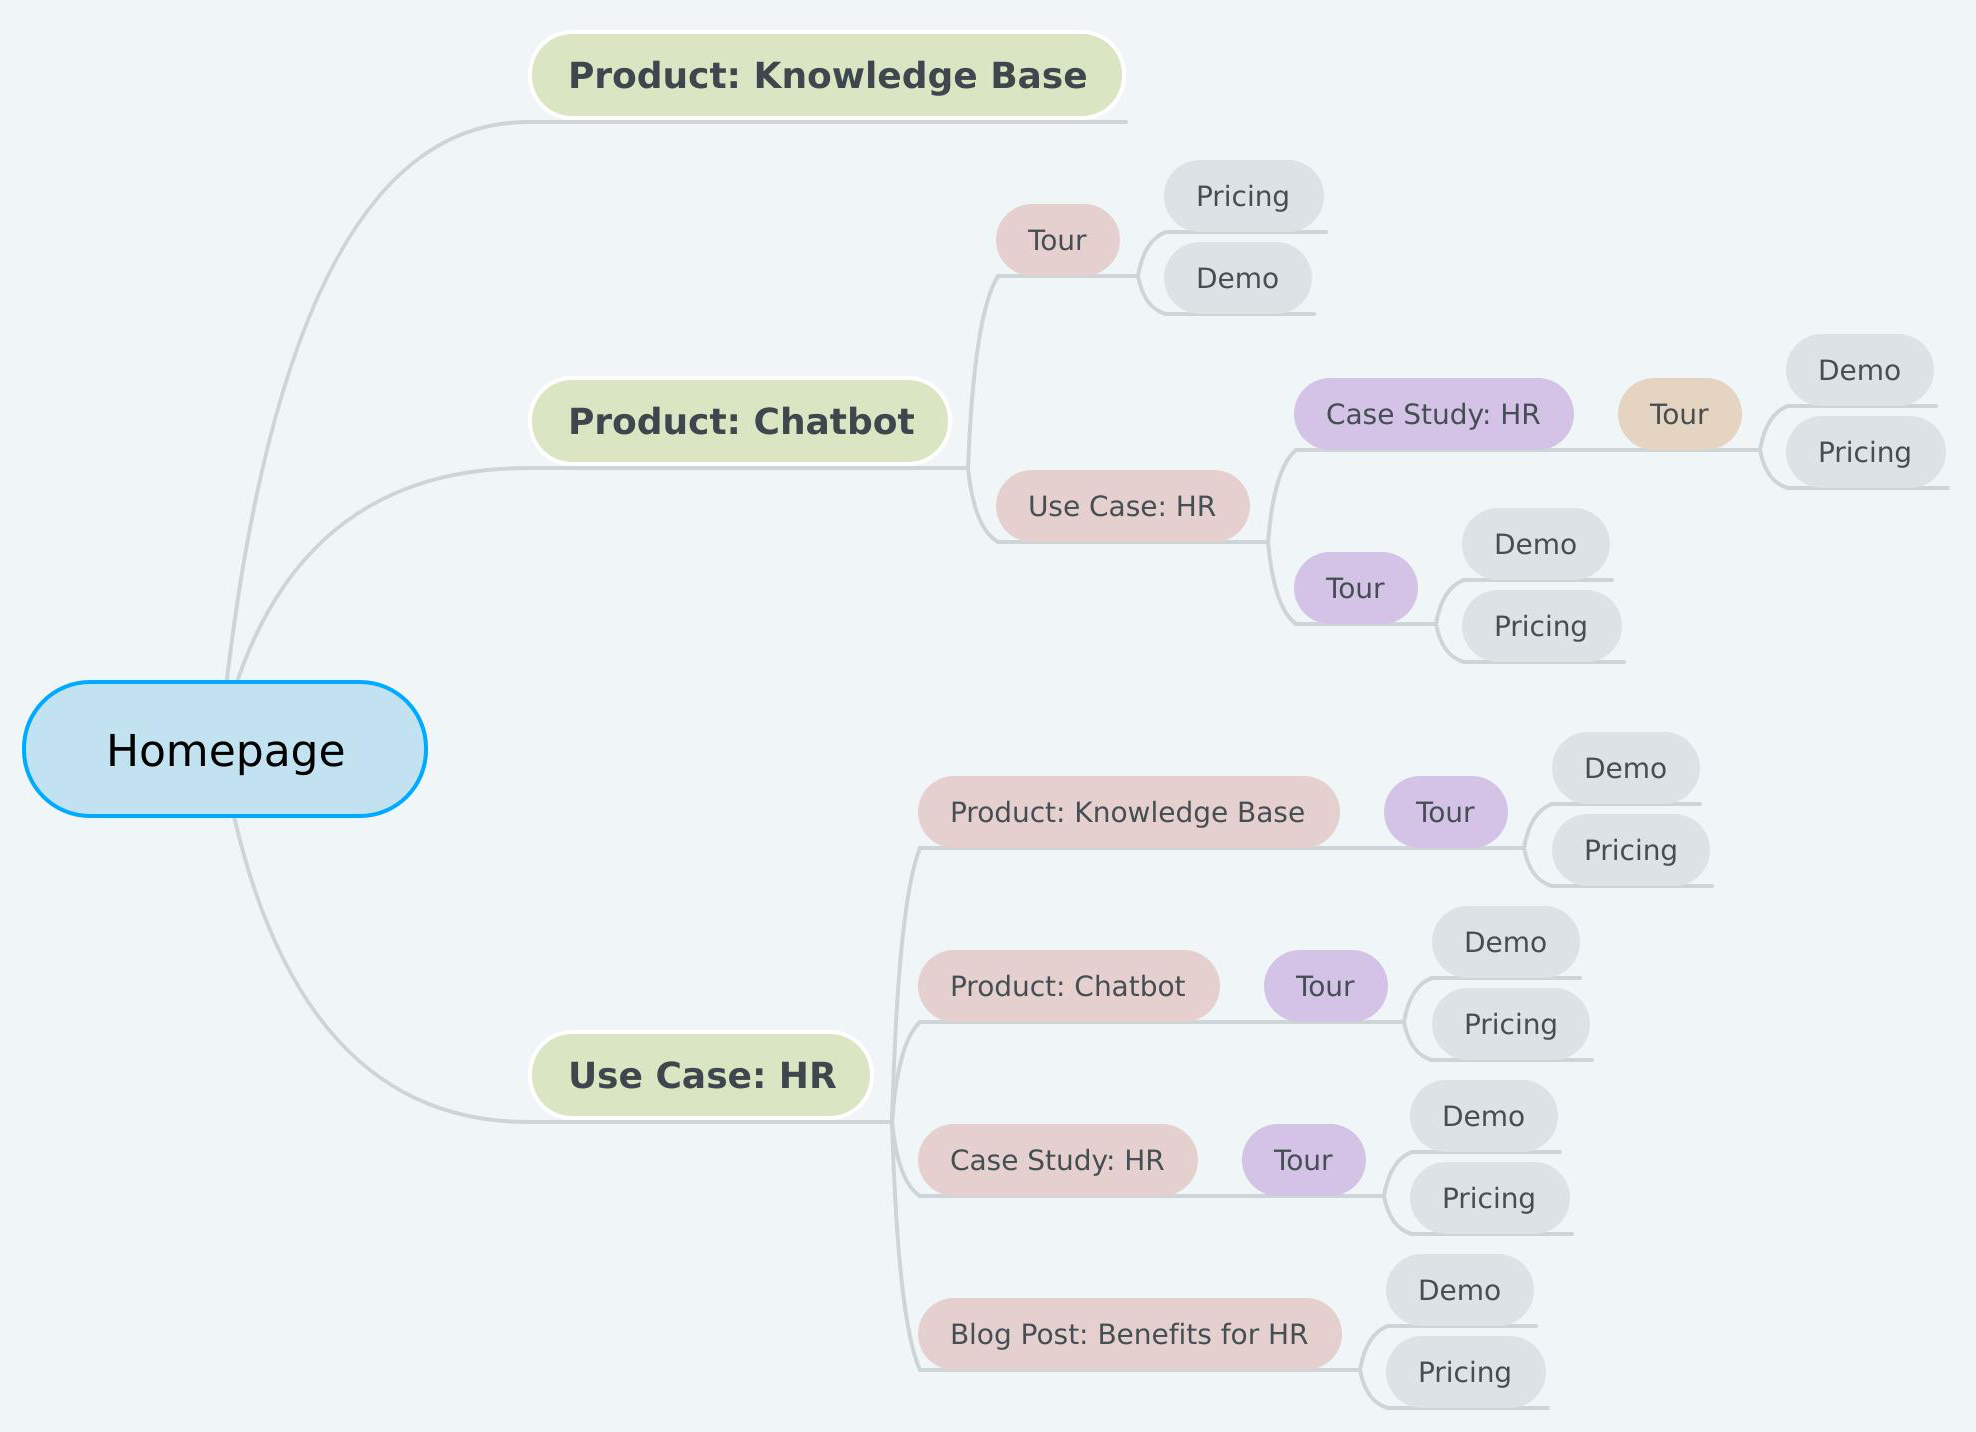
Mind mapping these potential journeys lets us see what links and CTAs we need to design for those pages. For example, we can see from the mind map above that the HR use case page needs to have links that point to the knowledge base and chatbot product pages, the HR case study, the tour page, and a blog post about the benefits of the tool for HR.
We can use this information to design those pages, ensuring that we include the information and CTAs on each that will move this persona deeper into the purchasing funnel.
And by mapping user flows for each of our audience segments, we can gather all of the information we need to consider the user experience and journey for each page we design.
Using Mind Maps for CX Design
Once you’ve created mind maps to design the UI and UX for your product’s website, it’s time to use them to create the customer experience inside of your product. The best part is that you can use these mind maps both in your own design process and for your developers to reference when writing code:
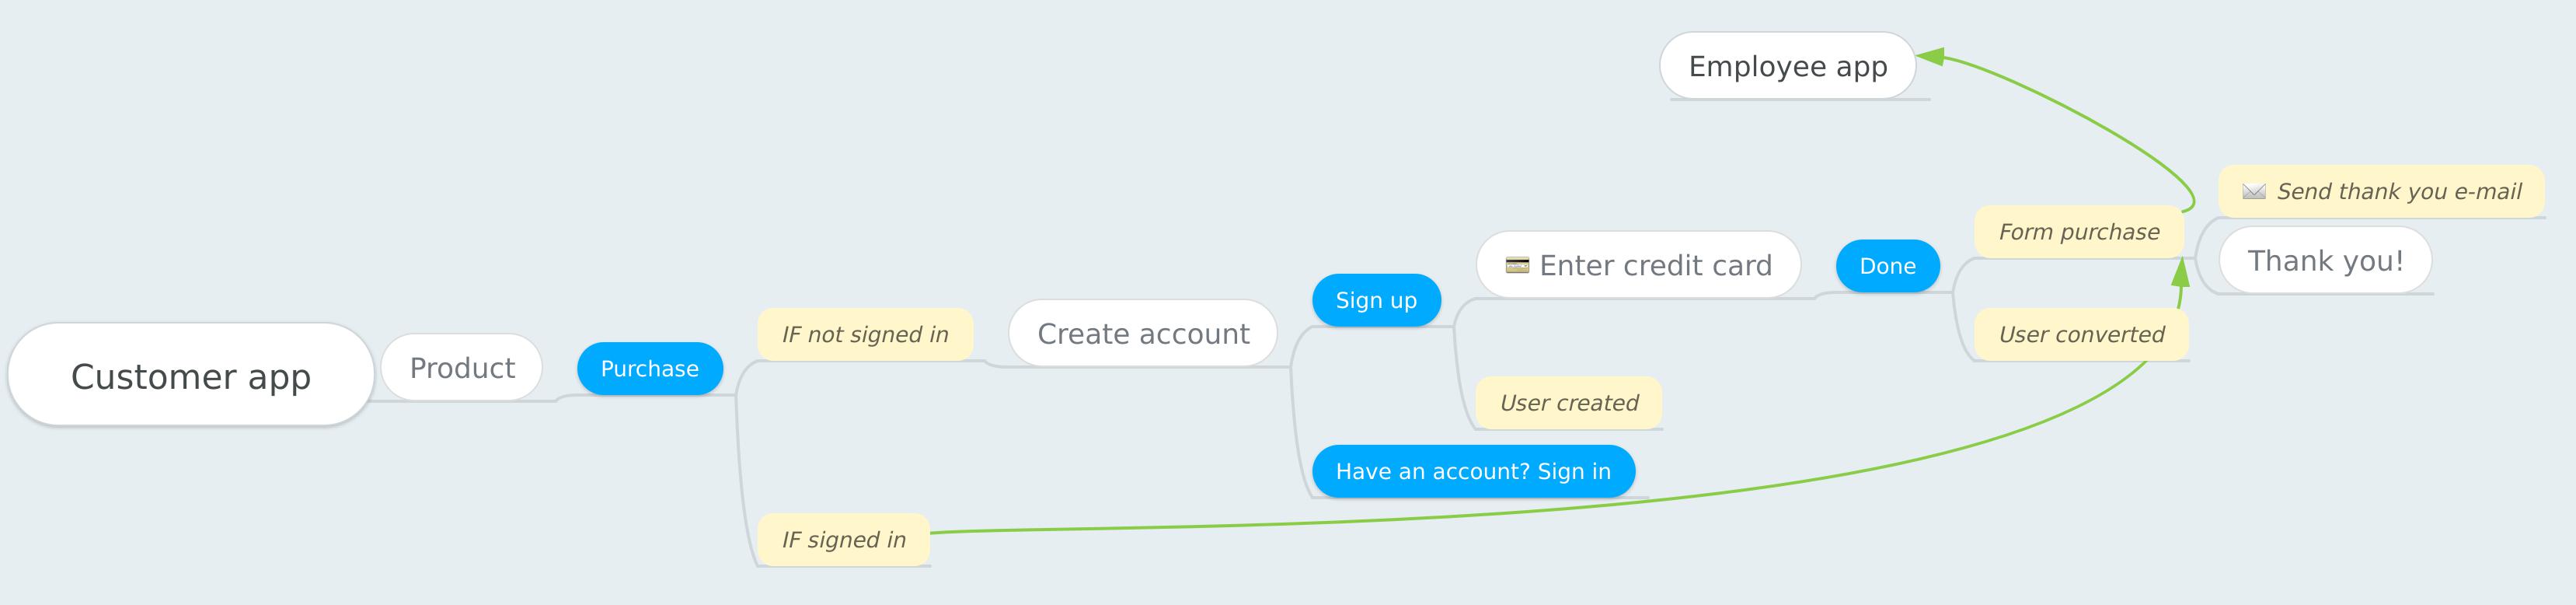
The template above was created by Eugene Rudyy (you can grab the template here) who says:
- “White nodes represent screens/physical locations.”
- “Blue nodes show actions that can be performed on that screen/location (e.g. product page has a purchase action).”
- “Yellow nodes starting with IF show conditions and scenarios.”
- “Yellow nodes describe what happens on the backend, time delays, or anything that users do not see but might experience.”
- “Relationship arrows (green lines) connect independent maps or jump over other nodes (e.g. an action in the customer app triggers events in the service/employee app).”
But beyond providing instructions to your developers, you can also use mind maps to create customer experiences that get new customers to their aha moments—that point in your tool that delivers the greatest value to most of your users and encourages people to continue using and paying for the tool.
For this example, let’s say that our biggest aha moment is when customers (HR specialists) realize they can use our chatbot to automatically answer questions from other employees at the company.
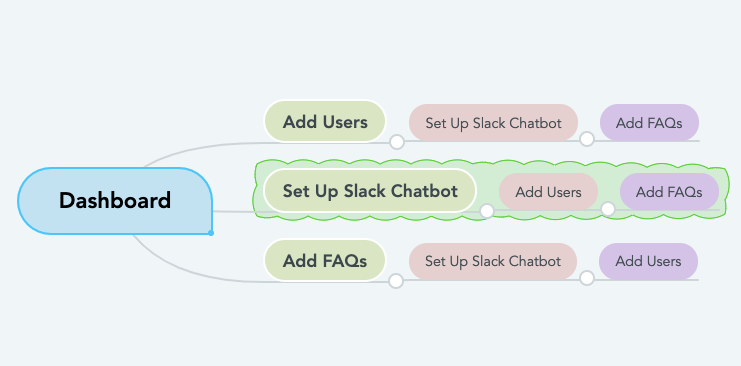
There are a lot of things HR specialists can do when they first log into our tool, but we want to guide them towards getting the chatbot set up first and adding responses to frequently asked questions. We can build a mind map showing what that flow might look like:
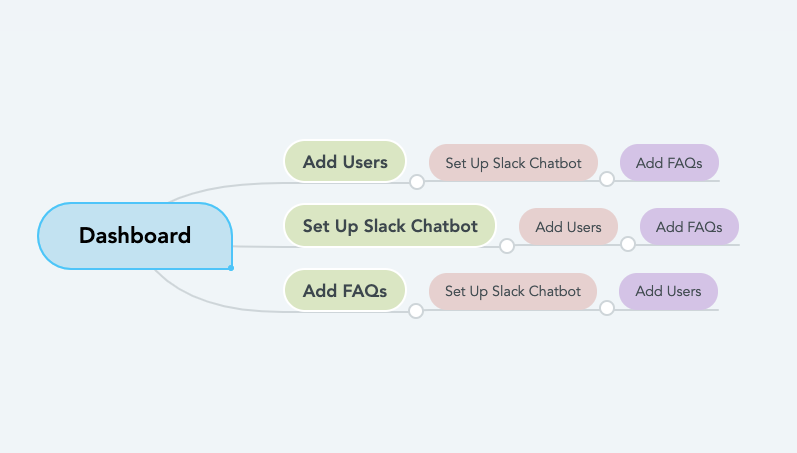
In this example, there are three things that need to be done before the aha moment can occur: customers must add users, set up their Slack chatbots, and add some questions and answers to the tool. Depending on which step they select in the app first, we can guide them through those actions either through links or an in-app tutorial.
We can also select the most ideal path and create an in-app tutorial that directly guides users through that flow if we want.
The Benefits of Using a Mind Mapping Tool for UI/UX/CX Design
Now that we’ve run through a few examples of how you can use mind maps for UI, UX, and CX design, you may be wondering how mind maps are better than other tools you might use. For example, all of the examples above could be created using basic flow charts.
But the reality is that all of the examples above illustrate really simple scenarios. Most design projects are far more complex.
For example, say you were building the UI and navigation for a major ecommerce site like Amazon. You would need something far more flexible than a simple flow chart to build your navigation, make decisions, and rearrange items.
Say you were designing the CX for a feature-rich marketing automation tool. There might be dozens of aha moments to consider for different customer types that each have different goals.
In these more complex scenarios, a mind mapping tool like MindMeister provides far more flexibility. Here’s how.

Collaborate with others
While designing these user interfaces and experiences, you’re going to need input and information from many other stakeholders and subject-matter experts—people who understand your audience and people who understand what can and can’t be built.
With MindMeister, you can collaborate on your mind maps with anyone in real-time. During a discovery meeting, you can each add bubbles, create connections, add links, and make comments directly inside of the mind map, making it easier to gather everyone’s ideas, suggestions, and comments.
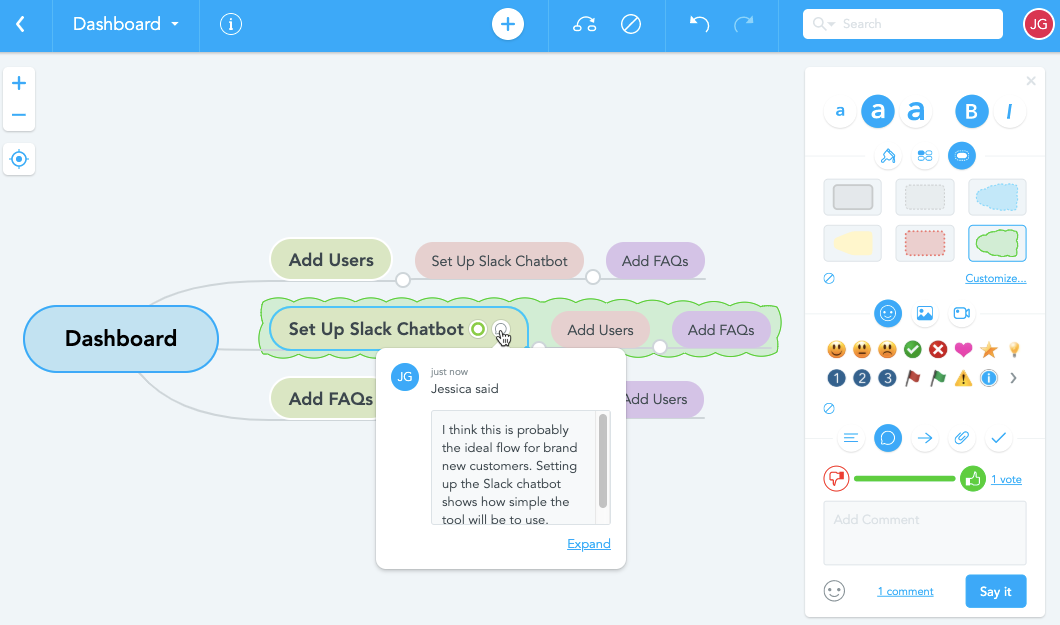
You can even let others vote on ideas to easily capture the most popular option based on the opinions of a variety of stakeholders and subject-matter experts.
Add images, files, and links to related assets
A MindMeister mind map can serve as a one-stop-shop for all of your design assets and instructions. For example, if you’re handing off a UI mind map to your developers, you can:
- Add images that show how specific page elements should be designed

- Add links to comps, prototypes, or wireframes in Google Drive, Dropbox, InVision, etc.

- Upload wireframe files or comps so they can be accessed without leaving the system

Illustrate complex scenarios
In addition to being able to make mind maps and flowcharts that are as large as you need them to be, you can also illustrate some more complex scenarios by adding connections between disparate items, use emojis to illustrate what’s happening at different touchpoints, or change the colors of bubbles to illustrate different actions, intentions, or page levels.
Finally, you can also turn your mind maps into slideshows that you can use to illustrate to project sponsors/developers how users will see the different interfaces you’ve designed. The slideshow tutorial below shows how that might work.
Designing UX, UI, and CX With Mind Maps
Mind maps are a flexible and collaborative way to design user interfaces, create user experiences that guide prospects deeper into the purchasing funnel, and get new customers to their aha moments as quickly as possible.
And with a tool like MindMeister, you can not only design these experiences and interfaces, but you can also create one-stop-shops for other stakeholders and team members, consolidating all of the information and assets anyone needs to understand and implement your designs.
Originally published in January 2017, this post has been completely rewritten to better illustrate how to use mind maps to design user interfaces, user experiences, and customer experiences.
You Might Also Like: Looking Back on 10 Years of Web Design